> ## Documentation Index
> Fetch the complete documentation index at: https://help.sonto.app/llms.txt
> Use this file to discover all available pages before exploring further.
# The Basics
> Your first walkthrough — add tasks, move them around, and find your way around Sonto
This is the best place to start. By the end you'll know how to add and edit tasks, schedule them, and
move between the screens that make up Sonto. Watch the walkthrough below, or read the written steps that
follow.
**Prerequisites:** [download Sonto](https://apps.apple.com/us/app/sonto/id6502294348) and
open it. You'll land on the **Day** screen.
## Move around your days
The Day screen is home base. Move **forward** a day with the right arrow, **back** a day with the left
arrow, and jump **straight back to today** with the curly arrow.
## Add and reorder tasks
Click the purple **+** to add a task (or press Cmd + N). To reorder your list,
pick a task up and drag it where you want it.
## Deal with a late task
A task left over from a past day shows a little **sleep icon**. Double-click it to open it, then either
clear the late status — which schedules it for today — or reschedule it to another day. Nothing slips
away quietly; you decide what happens to it. See [Overdue tasks](/reference/overdue-tasks).
## Open a task to do more
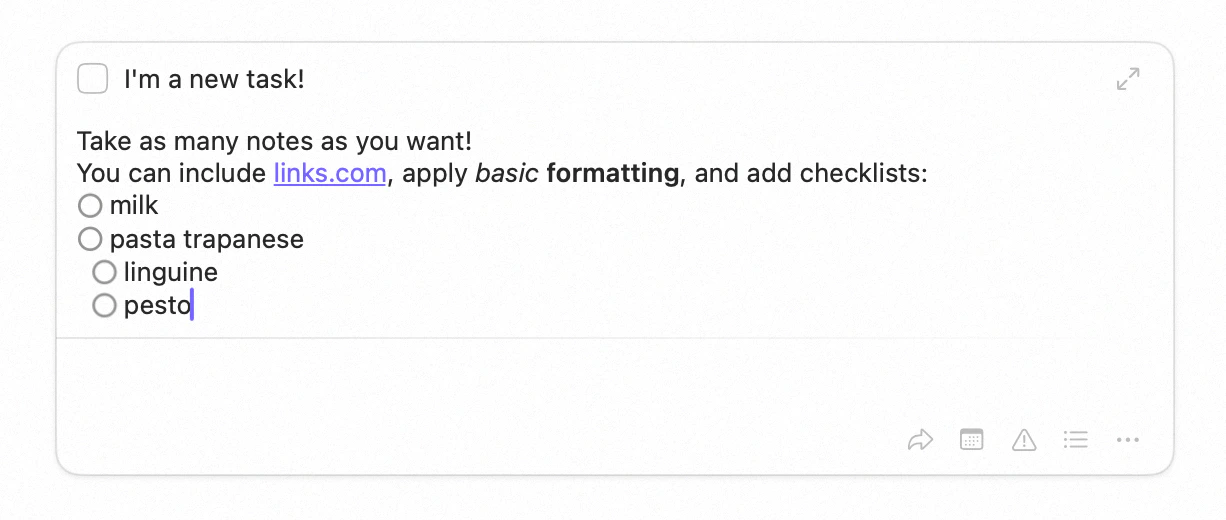
Double-click a task (or tap it on iPhone) to open it. From here you can:
* **Flag it important** with the triangle — the checkbox turns red.
* **Schedule it** using the calendar, or by typing the date straight into the name.
* **Type it naturally** — write the date, time, project, or tags into the name itself, like
`tomorrow 3pm #Work @urgent`, and Sonto files them for you. See
[Natural language input](/reference/natural-language-input).
* **Add notes** — type anything you like.
* **Move it** to the inbox (which unschedules it), or into an area or project.
* **Mark it in progress** from the menu (the icon becomes a play icon), or by long-clicking the icon.
Handy for longer tasks.
* **Focus** it — a full-screen, distraction-free view, great for writing. See [Focus](/reference/focus).
## The inbox is your holding pen
The [inbox](/reference/screens) is for tasks that aren't scheduled or filed yet. Empty it regularly —
schedule each item, file it in a project or area, or delete it.
## Think in weeks, not just days
Switch to the **Week** screen and you'll see your weekly tasks, the days of the week, and your calendar.
In Sonto, a week is a real planning unit: you can schedule a task **on a week** — meaning you want it
done sometime this week, but not on a specific day yet. As the week unfolds, you move each task onto the
day you'll actually do it.
You can also drag a task straight onto a day, a week, an area, or a project. Drop it on a day or week
and it's scheduled for *that* day or *this* week.
## Where to next
The ideas behind the app, so the rest makes sense.
Structure your tasks with projects and areas.
 ## Deal with a late task
A task left over from a past day shows a little **sleep icon**. Double-click it to open it, then either
clear the late status — which schedules it for today — or reschedule it to another day. Nothing slips
away quietly; you decide what happens to it. See [Overdue tasks](/reference/overdue-tasks).
## Open a task to do more
Double-click a task (or tap it on iPhone) to open it. From here you can:
* **Flag it important** with the triangle — the checkbox turns red.
* **Schedule it** using the calendar, or by typing the date straight into the name.
* **Type it naturally** — write the date, time, project, or tags into the name itself, like
`tomorrow 3pm #Work @urgent`, and Sonto files them for you. See
[Natural language input](/reference/natural-language-input).
* **Add notes** — type anything you like.
* **Move it** to the inbox (which unschedules it), or into an area or project.
* **Mark it in progress** from the menu (the icon becomes a play icon), or by long-clicking the icon.
Handy for longer tasks.
* **Focus** it — a full-screen, distraction-free view, great for writing. See [Focus](/reference/focus).
## The inbox is your holding pen
The [inbox](/reference/screens) is for tasks that aren't scheduled or filed yet. Empty it regularly —
schedule each item, file it in a project or area, or delete it.
## Think in weeks, not just days
Switch to the **Week** screen and you'll see your weekly tasks, the days of the week, and your calendar.
In Sonto, a week is a real planning unit: you can schedule a task **on a week** — meaning you want it
done sometime this week, but not on a specific day yet. As the week unfolds, you move each task onto the
day you'll actually do it.
You can also drag a task straight onto a day, a week, an area, or a project. Drop it on a day or week
and it's scheduled for *that* day or *this* week.
## Deal with a late task
A task left over from a past day shows a little **sleep icon**. Double-click it to open it, then either
clear the late status — which schedules it for today — or reschedule it to another day. Nothing slips
away quietly; you decide what happens to it. See [Overdue tasks](/reference/overdue-tasks).
## Open a task to do more
Double-click a task (or tap it on iPhone) to open it. From here you can:
* **Flag it important** with the triangle — the checkbox turns red.
* **Schedule it** using the calendar, or by typing the date straight into the name.
* **Type it naturally** — write the date, time, project, or tags into the name itself, like
`tomorrow 3pm #Work @urgent`, and Sonto files them for you. See
[Natural language input](/reference/natural-language-input).
* **Add notes** — type anything you like.
* **Move it** to the inbox (which unschedules it), or into an area or project.
* **Mark it in progress** from the menu (the icon becomes a play icon), or by long-clicking the icon.
Handy for longer tasks.
* **Focus** it — a full-screen, distraction-free view, great for writing. See [Focus](/reference/focus).
## The inbox is your holding pen
The [inbox](/reference/screens) is for tasks that aren't scheduled or filed yet. Empty it regularly —
schedule each item, file it in a project or area, or delete it.
## Think in weeks, not just days
Switch to the **Week** screen and you'll see your weekly tasks, the days of the week, and your calendar.
In Sonto, a week is a real planning unit: you can schedule a task **on a week** — meaning you want it
done sometime this week, but not on a specific day yet. As the week unfolds, you move each task onto the
day you'll actually do it.
You can also drag a task straight onto a day, a week, an area, or a project. Drop it on a day or week
and it's scheduled for *that* day or *this* week.
 ## Where to next